GEM 825 based mobil power station

Rokolya87

New member
Joined
Nov 14, 2021
Messages
12
Hi guys,
Nick is here. New to the forum, but a very long-time @hbpowerwall follower. I manage a vehicle storage facility that has quite a problem with electricity. The power company wants $25000 for the electrical hookup and 30 cents per kWh afterwords. No, thank you! I have to find a better way to spend 25 grand!
So to have a mobile power source handy around the property without using generators and hundreds of feet of wires, I bought a used GEM 825 electric utility cart with a roof rack for only $400. I didn't know much about 18650 cells back then but was hoping to hook up solar panels to the cart so it can charge itself.
Hooking up solar turned out to be a little beyond my limited understanding of DC electricity. Btw, the cart is powered by six 12v lead acid deep cycle batteries. And 72volt turned out to be quite painful to touch:). So I've decided to go the 18650 powerwall path since I needed 110V AC anyways.

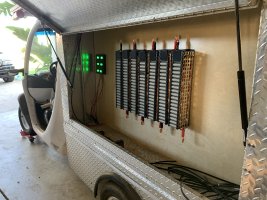
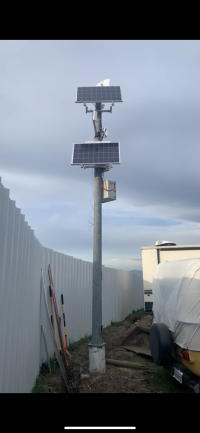
After watching hundreds of hours of videos on how to harvest cells and make 18650 packs, I made a self-sufficient internet pole. 12volt system that does not have an inverter at all. Should have gone for 24volts, because the majority of internet devices use 24v. Too bad, experience comes eventually, not instantly. The pole is equipped with a 180 Ah battery pack and charged with two 100W solar panels. The average consumption is 450Wh daily, therefore the 200 Watt solar setup is plenty. Victron Charge controller is making sure the pack doesn't go over 12.5 volts. Cells are balanced with Daly BMS. DROK DC converters were used to step up 12 to 24 volts and step down to 9 and 5 volts for cameras and infrared lights to help cameras see better at night.
 

Attachments

  • IMG_3937.PNG
    IMG_3937.PNG
    2.4 MB · Views: 88
  • IMG_3936.jpg
    IMG_3936.jpg
    751.8 KB · Views: 90
Last edited:
The pole receives a signal from the nearest tower and transmits wifi via extenders to 25 ring solar-powered security cameras. Every square foot of over 3-acre property is covered and, more importantly, secured for just $10 a month with $0 electric bill! Great! Moving on to the next project! 5kWt on wheels!
 
Last edited:
I like it! Especially when you can give the power company the proverbial finger. (y) And yea not that one.
Here in Maine we just got informed that our power bills from CMP (Central Maine Power) will go up 81% Jan 1 2022.
Ha neighbors how's my solar looking now? Not so bad is it.
Wolf
 
This time I've decided to go 24volts. Got 7 102p packs ready. I borrowed the bracket designed from Peter. Btw, please consider becoming his Patreon and drop a few bucks if you use his blueprints. I did.

A few modifications I came up with after watching his videos:
  1. Replace the bottom row with 18mm carbon fiber tubes instead of dead cells. That is why I have 102 cells, not 105. 3 "cells" are just carbon tubes covered with shrink wrap to match the other cells. Next time I'll do all 5 bottom and top "cells" with carbon to have them "switchable". I ended up having 4 "left handed" and 3 "right handed" ones.
  2. Powdercoat the bracket with dielectric paint to prevent shorts. Probably overkill, but since this thing is going to be moving, I have a feeling it is worth it.
 

Attachments

  • 65836111142__247DCBDA-1BB7-44BF-9CCF-6956C90FC8B7-preview.JPG
    65836111142__247DCBDA-1BB7-44BF-9CCF-6956C90FC8B7-preview.JPG
    3.3 MB · Views: 93
Nice Job! Thank is a similar design to mine but much cleaner looking. I also have been making AmmoBats in metal ammo cans that have about 70A at 7s 24vdc so 1.5-2kwh depending on which cells I use. I like the durability and portability of them and I have Anderson PP plugs and USB C PD for charging phones and laptops so very versatile.
 
One step closer every day. GEM cart will have:
- 110V on board
- 18650 chargers to capacity test new batches. Don't have the space anywhere else right now.
- Vacuum cleaner charger 23V
- Milwaukee charger 110V
- Ryobi charger 18V
- Trailer wiring tester 7 pin
- LED light all around the cart to light up work area
- 12V charger
 

Attachments

  • IMG_4023.JPG
    IMG_4023.JPG
    2.8 MB · Views: 88
One step closer every day. GEM cart will have:
- 110V on board
- 18650 chargers to capacity test new batches. Don't have the space anywhere else right now.
- Vacuum cleaner charger 23V
- Milwaukee charger 110V
- Ryobi charger 18V
- Trailer wiring tester 7 pin
- LED light all around the cart to light up work area
- 12V charger
how did you mounted your liitokalas?
 
how did you mounted your liitokalas?
There are 4 screws that hold the back on the charger case. I took one back side off and drilled the holes in the plywood using it as a stencil . Then took the rest of the screws out of the remaining chargers and used longer screws with the same diameter that went thru the plywood into right into the charger case. Took me a while to measure and find the right screw size, so it won't damage the charger insides, won't pierce thru or would be too short to hold it securely. I'll make a few pictures of the back side before I close it with another sheet of plywood.
 
Last edited:
There are 4 screws that hold the back on the charger case. I took one off and drilled the holes in the plywood. Then took the rest of the screws out of the remaining chargers and used longer screws with the same diameter that went thru the plywood into right into the charger case. Took me a while to measure and find the right screw size, so it won't damage the charger insides, won't pierce thru or would be too short to hold it securely.
Neat, thanks a lot. I need to find a way to secure my chargers in the future. For now i have 8 and secured differently, but i want to get more in the future.
 
Almost done! Just a few minor things here and there
 

Attachments

  • IMG_4202.JPG
    IMG_4202.JPG
    2.5 MB · Views: 50
Not exactly proud of the back side. I did a good job organising and hiding all the wires on one side. One day I’ll reach ZEN and organize the other side:))) I used a white peg board to cover my shame for now. Pretty handy to keep tools organised!
 

Attachments

  • IMG_4197.JPG
    IMG_4197.JPG
    1.6 MB · Views: 51
Last edited:
Here is another angle. I'll rivet the backdoor shut once its all done.
 

Attachments

  • IMG_4198.JPG
    IMG_4198.JPG
    2.1 MB · Views: 49
The trailer tester plug is up and running already! 7 pin connector works flawlessly! I can run a test for brake lights, turn signals, marker lights, 12v AUX, electric brake and even backup lights!
 

Attachments

  • IMG_7272.JPG
    IMG_7272.JPG
    2.5 MB · Views: 53
  • IMG_4114.JPG
    IMG_4114.JPG
    2.7 MB · Views: 53
All done! Turned out to be pretty versatile and helpful around the yard.
 

Attachments

  • IMG_4287.jpg
    IMG_4287.jpg
    3 MB · Views: 47
  • IMG_4288.jpg
    IMG_4288.jpg
    1,006.3 KB · Views: 43
  • IMG_4289.jpg
    IMG_4289.jpg
    558.1 KB · Views: 44
  • IMG_4290.jpg
    IMG_4290.jpg
    936.9 KB · Views: 43
  • IMG_4291.jpg
    IMG_4291.jpg
    3.2 MB · Views: 44
At one point I was slightly shocked by the static, so the ground wire is a must.
 

Attachments

  • IMG_4088.JPG
    IMG_4088.JPG
    2.4 MB · Views: 40
Back
Top