Embarrassing Wiring Question

garolittle

Member
Joined
Oct 27, 2017
Messages
100
DUThanks So I thought it would be cool to add a headlight and a horn to my electric go kart. Just for fun, I decided to run the horn and headlight using a separate 12V battery pack of 18650 cells (4S4P configuration). I bought the following 12Vhorn, light, and switch:

https://www.aliexpress.com/item/32735253397/32735253397.html

https://www.aliexpress.com/item/32745293445/32745293445.html

https://www.amazon.com/dp/B01AUYK4EC/ref=cm_sw_r_cp_api_lN8FAbJYVGBQZ

There is only one problem. I do not know how to wire everything together. :-/ I searched YouTube for tutorials but did not find anything using a switch like the one above. I would be very grateful if someone someone could post a drawing of a simple wiring diagram. All I want to do is mount the headlight on the front of the go kart and the horn and switch on the steering wheel. Thanks for any help anyone can offer.
 
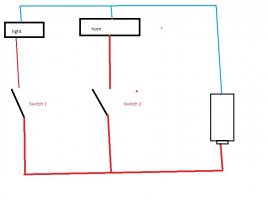
My 5 second drawing.
Red is positive and blue negative and the battery is just symbol.
Dont forget to add a fuse close to the battery on for instance the red line!


image_jaoevy.jpg
 
Thanks for the response. That is helpful.One of the things that is confusing me is the switch hasfour wires and two of the wires are connected (the blue and the yellow wires). See picture below.I believe these two wires are for the horn and the headlight but there were no instructions with the product. I believe the red and green wires represent positive and negative but I am not sure.How would I connect the switch in the picture below to the circuit drawn above? I know this is a basic question but for somereason it has confused me. :s I really appreciate yourhelp.

image_dhpiok.jpg
 
The blue and yellow represents the blue wiring on my drawing and the other 2 is the output that you connect to the lamp and the horn.
 
If you are still lost, you can always take you DMM and measure the resistance/Ohm of each pair of wires. You'd connect to 2 wires, check the value, press a button, check the value, press the other button, check the value, go to another pair, repeat. This way you'll find out which 2 wires go to each switch
 
So this is where I show my ignorance again. How does the red positive wire from the diagram above connect to the switch I purchased?
 
I'm guessing that since you have 4 wires, then 2 wires go to one switch, then 2 go to the other. The simple answer is, you connected voltage in from the batter on one wire to one switch, then connect its pair to voltage out and to the device. Then do the same with the other switch.
It's just a break in the connection.

If you are taking voltage directly from the battery, then you'd take 1 wire from each pair and connect them together and connect that to the battery source. Then you will have 2 wires left over, one for horn the other for light

But, I would recommend putting a fuse before you merge the wires together, meaning you'd have 2 fuses, one to each switch.
 
New image attached with colors based on your switch

image_mteylr.jpg
 
You guys are awesome. I will give it a try and post the results. Thanks for taking the time to explain it.
 
Good job that you've sorted it!
Actually the manufacturer of the switch already tried to help you and tried to be clever, but he failed to a certain extent :D
The red and green wire correspond to the red and green switch, so that's obvious. However the common blue/yellow wire should have been red but that is already taken now. He could have used another color for the red switch and ideally a common color for the common wires instead. And just use a single wire. Would be much easier to understand.
 
DarkRaven said:
Good job that you've sorted it!
Actually the manufacturer of the switch already tried to help you and tried to be clever, but he failed to a certain extent :D
The red and green wire correspond to the red and green switch, so that's obvious. However the common blue/yellow wire should have been red but that is already taken now. He could have used another color for the red switch and ideally a common color for the common wires instead. And just use a single wire. Would be much easier to understand.

It was a little confusing but it worked out well. I like starting with small projects and working up to the larger ones. It is less expensive if something goes wrong and less risk since smaller battery packs do not have as much electricity stored. Thanks again for all the excellent advice.
 
Back
Top