Esmart3 nuissances

kanchana said:
rcuetara said:
kanchana said:
I used the ipanda app you posted I did not fix my voltage setting it only works for the current setting. Any one know the contact details for them ?

Hi,

To change the battery voltage ratio back to the 1644 default use the sequence:

AA010002030403006C06D7

instead of the AA010002030407007E04C3 sequence in step 5 of the document in the link wycito posted.

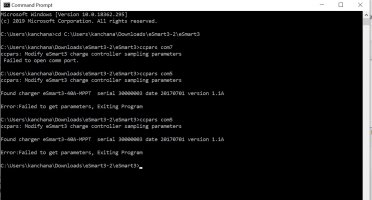
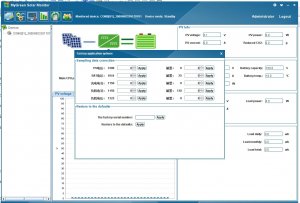
Thanks it worked. But now I am at the very beginning. instead of battery voltage of 56.2volats esmart 3 shows 62.8 volts . tried your programme it exits giving an error ?. Serial number reading seems to be wrong my actual number is 2018031428616-3 .
image_jaxtbk.jpg

image_xoqmwc.jpg
Any advice how to change the voltage reading with out messing it up again ?
Hi, here are a few values for the sequence, followed by the ratio, two above and two below the 1644:

AA010002030403004C06F7 1612
AA010002030403005C06E7 1628
AA010002030403006C06D7 1644
AA010002030403007C06C7 1660
AA010002030403008C06B7 1676
Byte #9-----------------^^ ^^
Byte #11----------------------^^
To get these I added or substracted 16 (hexadecimal 10) to byte #9 and the opposite to byte #11, that is if you increase byte 9 you need to decrease byte 11.
The 16 unit jumps may be too big, to calculate some other value, you have to do some hexadecimal arithmetic with bytes 9 and 11.

As for the program, I tested it on a 60 A model, looks like the 40 A model has a different sequence for the parameters. If you or somebody else with a 40 A model wants to modify the prugram, I posted the source code to github, see my original post above. The most likely dfference would be the number of bytes returned, The 60 A model uses 38 in the command to read parameters (line 149 of the source code), the 40 A model probably uses less.
The serial number is the one reported by the device, it is the same for both ccpars and mygreensolar programs, shown by the images you posted.
 
I know this is an old thread but is has some great information on the Esmart3

I currently have my Esmart3 working in station mode and the app works OK. Is it possible to use the windows version of mygreen solar to modify values using the ip address of the cloud box?


image_itznjp.jpg
 
fisht99 said:
I know this is an old thread but is has some great information on the Esmart3

I currently have my Esmart3 working in station mode and the app works OK. Is it possible to use the windows version of mygreen solar to modify values using the ip address of the cloud box?


image_itznjp.jpg
I have exactly that setup
I have a Linux machine with Wine installed (allows to install windows applications in Linux) for the effects of what you need is the same thing.

I connect this machine to the WIFI of the Cloud Box which assigns an IP address to my machine with access point being 192.168.5.99
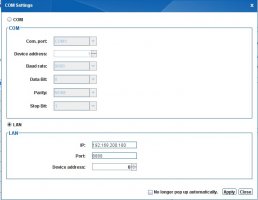
Once the above is completed set your app to port 8080 and Device address 1 as seen below:
 
wycito said:
fisht99 said:
I know this is an old thread but is has some great information on the Esmart3

I currently have my Esmart3 working in station mode and the app works OK. Is it possible to use the windows version of mygreen solar to modify values using the ip address of the cloud box?


image_itznjp.jpg
I have exactly that setup
I have a Linux machine with Wine installed (allows to install windows applications in Linux) for the effects of what you need is the same thing.

I connect this machine to the WIFI of the Cloud Box which assigns an IP address to my machine with access point being 192.168.5.99
Once the above is completed set your app to port 8080 and Device address 1 as seen below:

Thanks

I ended up using a RS485 usb adaptor hooked up to a raspberry pi. I then modified the script from:http://skagmo.com/page.php?p=documents/04_esmart3_reviewand pushed the data into home assistant / grafana.
Works a treat
 
I know this is an old thread, but I've found the way to correctly calibrate the eSmart3 MPPT Charge controller. First, you click onto the gear on the top-right corner and type solar888 as the admin password, then on the 3rd field down on the left, type the current voltage of your batteries (using a volt-meter) and accept the changes. Voila!, the voltage on the controller matches the one on your batteries. Mine was about .5v higher than the actual battery voltage.

PS: If the fields are in chineese, use a tool from google (Google Translator) and use the camera to view the translation in English.
Gosh.... you saved me hours of crazy calibration.... hidden menu works like a charm !!!!
 
Gosh.... you saved me hours of crazy calibration.... hidden menu works like a charm !!!!
KEEP READING!!!!!!!!!!!!!!!!!!!!

Not the 3rd, very important!!!!!

OP should edit that or an admin to prevent more people screwing up their SSC.
 
KEEP READING!!!!!!!!!!!!!!!!!!!!

Not the 3rd, very important!!!!!

OP should edit that or an admin to prevent more people screwing up their SSC.
yeap, I read that is not the 3 field, Im working on other.... should I use BIAS field by +-0.1 value to calibrate?
 
KEEP READING!!!!!!!!!!!!!!!!!!!!

Not the 3rd, very important!!!!!

OP should edit that or an admin to prevent more people screwing up their SSC.
The correct field to change is? It might help other with the Esmart3.
later floyd
 
second field in the right column, you put the V value or the "1658" number that match my Battery voltage?
My Esmart3 CC is 0.8 away from the battery voltage, I was thinking increase 0.8 to each bulk float etc. value to leave like this :)
Opinions please
 
You type the right battery voltage in the second field in the LEFT column and hit Apply. That's it. Use a translation app on your phone to find out.

Do this at your own risk. I screwed it and I had to find a way to restore it to a working condition.
 
Later on I will play with this setting, for now, since the Esmart3 is 0.8 below the battery
I will lower the bulk float equaliztion values by 0.8
So to have a sync charging with reality
Then I will review load and PV voltage when PV are ready :)

I do program... so I need to dive into Python and all tools needed

Thanks all for your replies and light on this matter
 
Hello, I have an mppt eSmart3 60A and I played with the settings and now it doesn't display the current anymore. What is the sequence for the current? For the battery I put AA010002030407007E04C3
 

Attachments

  • eSmart3-60A.png
    eSmart3-60A.png
    358.1 KB · Views: 22
În sfârșit, mi-am putut repara controlerul. Am trimis un e-mail echipei ipanda, am folosit adresa găsită în aplicație, spunându-le exact ce s-a întâmplat. Practic că l-am înșurubat și a fost total vina mea. După aproximativ o săptămână de așteptare am primit astăzi un răspuns cu un program numit „AccessPort.exe” și un set foarte detaliat de instrucțiuni și imagini.

Practic, vă conectați la controler folosind cablul lor RS485 la USB și trimiteți un set de valori furnizate de echipa lor de asistență. Întregul proces durează doar 3 minute și este foarte simplu, cu condiția să aveți instrumentele și instrucțiunile potrivite.

Mulțumesc tuturor celor care au încercat să ajute.

Bună, Ce secvență ați folosit pentru a indica curentul? Mulțumesc
 
Thank you, but I still did not succeed with the charging current, 1150 must be set, at least a value should be written
 

Attachments

  • eSmart.jpg
    eSmart.jpg
    396 KB · Views: 19
Did you try what I wrote in #15 ?

1. PV Voltage 3300 = AA01000203040100E40C5B
2. BAT Voltage 1666 = AA010002030403008206C1
3. Charge Current 2090 = AA010002030405002A0815
4. Load Current 2200 = AA010002030407009808A5
5. Load Voltage 1666 = AA010002030409008206BB
 
Back
Top