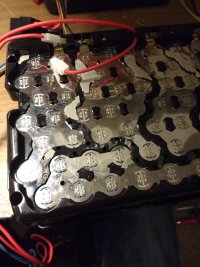
I thought i was lucky, when...

Cherry67

Member
Joined
May 13, 2018
Messages
518
... i got 4 Bike packages in my preferred bike shop.

4 times 36 V 18 Ah, gives some 600 Wh per pack.

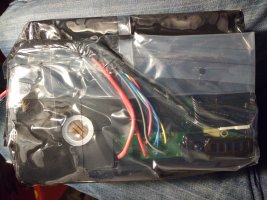
Then i opened the first to see a truly profesional build.


image_shatsl.jpg


Sealed in some bag plus silicone it will withstand many challenges.

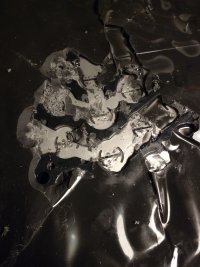
It is possible to peel it off, but it would be a tremendous time to do.


image_nyjeom.jpg


Any ideas to fight the silicone ?
 
You could try denatured alcohol, xylene, or mineral spirits *paint thinner). That might soften the silicone up so you can break it away easier.
 
There's plenty of properly formulatedsilicone removal products available. ...


image_drjnre.jpg
 
I thought of that Sean. But the problem is this is coming into contact with the cells. I suppose if Cherry doesn't mind re-wrapping all the cells, it'll be just fine ;)
 
Korishan said:
I thought of that Sean. But the problem is this is coming into contact with the cells. I suppose if Cherry doesn't mind re-wrapping all the cells, it'll be just fine ;)

Cells have a small rubber ring underneath the plastic protector. I would be concerned about dissolving that. I think the safest way is going to be mechanical removal.

Looks like that is going to be a difficult job.
 
Geek said:
Korishan said:
I thought of that Sean. But the problem is this is coming into contact with the cells. I suppose if Cherry doesn't mind re-wrapping all the cells, it'll be just fine ;)

Cells have a small rubber ring underneath the plastic protector. I would be concerned about dissolving that. I think the safest way is going to be mechanical removal.

Looks like that is going to be a difficult job.

Good point. An even more reason to go with something a little less aggressive. The alcohol or xylene he could either brush on, drill a few small holes and pour tiny amounts in, or possibly lay the packs down in a shallow bowl with very little covering the bottom, just enough to wet the silicone. The silicone should then wick up the solvent/softener (in theory)
 
You all summarized what i have seen as the problems.

Of course i googled before i asked here.

Recommedation go either the way of using detergent (pure, without water), baby oil or similar oily substances to reduce adhesion of the silicone to al pack materials, "undercreeping " it, making the peeling off easier.

Or they count of heavy chemical weapons like benzine, Naphta, Acetone... to attack the silicone directly.

I either case i doubt to be successful to get the cell out of the partially sorrounding tubes, with acceptable effort.

And, as said above, the chemicals might not stop on the silicone but may destroy the important cell insulation or head ring as well.

Plus, the peeling off would go on a "life" battery with all the dangers of shortcut. Nice harakiri job.

So, what else?

Until now i was succesful, with minor effort, to remove the BMS.

1) I might try to use the packs just as they are, 10s6p. My plan, desribed in my previous threads, was somewhat different..... for valid reasons. But, i cannot dump a capacity higher, as i have as a total now.... and there is probably more to come. Impossible to ignore such a chance.
Means i would change from 6sxP (my current approach) to the higher voltage 0f 10sxp.


First question to the family, i know 12 and 24 volt Inverter (isle inverter), but are there some on 36 Volt ? omd 72 Volt ?

2) I might make a connection to the pack at 6s, using only 60 % of the pack. This goes against the "constitutional rights of functional cells" to be used in secondary life, so no way.

Any more ideas ?
 
Here's a thought. Use a rotary tool to cut the top layer to expose the cell, cut the wrapper, use some baby oil to seep between the cell and the wrapper, and then just push the cell out from the other side. Then use alcohol to clean the oil back off to re-wrap.

I think overall, you're going to end up needing to re-wrap anyways.

Keep us updated on what you do and how it goes so we'll know what to do if we get one of these types of packs ;)
 
Korishan, probably i will go the easy way. You all surely will get all news i have to provide.

Another thing is interesting of this thing : The BMS.


image_arpvbs.jpg

This is a 10 S BMS. Does anybody see the resistors of the surge channels ? There is no sign that they are placed on the underside.
 
The 4th pack is on 36 Volts.

means so far 180 cells which are not under-voltage.... still a day.
 
I have good news, which is bad news :D .

First, the 4th pack showed up as a different version, but obviously same "mechanical school". Same manufacturer, similar lookalike, same out Case lock mechanism.


image_nilvxz.jpg


Different capacity : 12 Ah, not 18 as the others. Red Cells (anyone bet against Sanyo ?), the others have light grey ones.
And, most important: Not sealed with this devilish silicone. Much more easy to evaluate the mechanical issues.


image_cbbvqy.jpg


And that is the bad news. The casing probably contains tubes for the inner cells as well, plus the mechanic of the metal grid and the plastic is quite suspicious. I would bet the grids are inlays of the mould forms, fixing the inlay into the plastic. And by welding them the plastik cannot be removed anymore....

All in all, it looks like either use the blocks as they are, or dump them. The disadvatage would be the build would look like a heap out of the wastebin, the advantage would be that i have a modular setup in mind anyway.

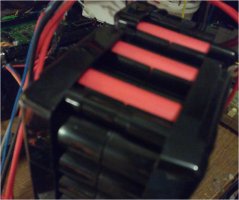
Next, i dug into block 3 a bit, to try to identify the cells.


image_mnqeil.jpg


NCR 18650BD, Panasonic 3 Ah, i would guess. The type is not in the cell database.

Next, i have had the first block through a complete Charge-Discharge cycle. In using my beloved B6AC, i looked for the blocks electrical middle, and handled the upper and lower half of the block separately, as 5s6p. This can be done with the B6AC.
Discharging went very well on both halfs, all cells/levels very equal, which shows that cells have similar behaviour without a defect one.

Capacity about 13 Ah, perhaps a bit more, i didnt fully discharge to 3.0. Not new cell behaviour, but by far enough to be used.

For the moment, i will use the blocks as they are, as long as all are working fine.
If i get one block which is unusable i will clarify if they can be demounted.
 
Cherry67 said:
The 4th pack is on 36 Volts.

means so far 180 cells which are not under-voltage.... still a day.

Can't you just remove the nickel strips by rolling them off with some needle-nose pliers? I wouldn't use a solvent because it could dissolve the seal on the vent valve. If removing the nickel strips removes the potting on the top and bottom of the cells you can just re-wrap the cells and they should be good to solder or weld on busbars/fuses.
 
Hey cheery
I feel your pain!!

First one i recieved like this had ncr18650pf cells in it. It was a pain.
Wrote about it in my build thread i think. Ended up using a dead cell to push out the live cell (after removing the plastic with snippers) using a hydraulic press. Cells in perfect condition, but wrappers are messed up. The cell holders were hexangonshaped and not round so rubber engulfed each cell from the sides too!

Then i got 6 more packs.
2x the red ones u have, no rubber. Spotwelds come off super easy, pack disassembled in like 20mins. Cells are only sanyo r1112 (2200mah)
4x the one u have with the ncr18650bd, (3200mAh).
So far taken apart two completely. Cells are perfect so i will take apart the others too.
The annoying thing with the rubber is that it seeps into and around the cells, atleast these are round holders so less gets down the sides of the cells.Its impossible to pull the pack apart even after removing screws and busbars (tried with the hydraulic press!)

Do the following (yes it takes a bit of time :( )
Remove the bms
Use pliers to pull off the busbar nickel strip. These come off easily and you wont rip holes in the cells. Expose just enough of the busbar to grabit, u will pull off the silicone ontop of it with the busbar so you can save the effort there.
Use fine snippers where the blade is right at the edge, and cut off all those plastic parts that are holding the cells in at the positive and negative sides. Cut them off right where the cell is. Do this on both sides!
Remove the 4 screws holding the two halves of the cell holders together. On on each corner and in oposite directions, so two screws each side of pack.
Then the fun begins
I found best to use a 18650 spacer (the plastic cylinders u sometimes find in laptop batteries).
Place it on the positive end of one of the cells in the middle of the pack. Positive end because the wrappers more likely stay in takt, otherwise u will push the cell through and the wrapper will stay in the pack. Push against it with a lot of force! And i mean a lot. Some are looser then others, depending on how much of that solicone managed to creep down between holder and cell. start with the inner cells, they are easier to get out. Then work your way out.
You could also use a dead (really dead!!!!!) cell. But then ud need to push on the negative part of cells in the pack as to not short out the positive and negative when maybe squishing through the wrapper.
Outside cells are a pain. Scratch off as much silicone from everywhere as you can!
Then repeat from above.
When you reach about 10 cells left in the outer ring you can start trying to pry the holders apart.

GOOD LUCK! (You will need it :D )
 
SolexxX said:
Cherry67 said:
The 4th pack is on 36 Volts.

means so far 180 cells which are not under-voltage.... still a day.

Can't you just remove the nickel strips by rolling them off with some needle-nose pliers? I wouldn't use a solvent because it could dissolve the seal on the vent valve. If removing the nickel strips removes the potting on the top and bottom of the cells you can just re-wrap the cells and they should be good to solder or weld on busbars/fuses.

Above all, i hate to remove the nickel strips, i prefer to have them in pairs including the original stripe.
Removing stripe enforces you to solder on the cell, or better weld again. Its not that i wouldn't be able to solder them, but its a stress not necessary for the cell when the stripe is left on for solder purposes.

I know that i fail to have the nice look of all your pretty arrays, but i want to have the current, not sell the pictures. :D


The-J-Man said:
Hey cheery
I feel your pain!!

First one i recieved like this had ncr18650pf cells in it. It was a pain.
Wrote about it in my build thread i think. Ended up using a dead cell to push out the live cell (after removing the plastic with snippers) using a hydraulic press. Cells in perfect condition, but wrappers are messed up. The cell holders were hexangonshaped and not round so rubber engulfed each cell from the sides too!

Then i got 6 more packs.
2x the red ones u have, no rubber. Spotwelds come off super easy, pack disassembled in like 20mins. Cells are only sanyo r1112 (2200mah)
4x the one u have with the ncr18650bd, (3200mAh).
So far taken apart two completely. Cells are perfect so i will take apart the others too.
The annoying thing with the rubber is that it seeps into and around the cells, atleast these are round holders so less gets down the sides of the cells.Its impossible to pull the pack apart even after removing screws and busbars (tried with the hydraulic press!)

Do the following (yes it takes a bit of time :( )
Remove the bms
Use pliers to pull off the busbar nickel strip. These come off easily and you wont rip holes in the cells. Expose just enough of the busbar to grabit, u will pull off the silicone ontop of it with the busbar so you can save the effort there.
Use fine snippers where the blade is right at the edge, and cut off all those plastic parts that are holding the cells in at the positive and negative sides. Cut them off right where the cell is. Do this on both sides!
Remove the 4 screws holding the two halves of the cell holders together. On on each corner and in oposite directions, so two screws each side of pack.
Then the fun begins
I found best to use a 18650 spacer (the plastic cylinders u sometimes find in laptop batteries).
Place it on the positive end of one of the cells in the middle of the pack. Positive end because the wrappers more likely stay in takt, otherwise u will push the cell through and the wrapper will stay in the pack. Push against it with a lot of force! And i mean a lot. Some are looser then others, depending on how much of that solicone managed to creep down between holder and cell. start with the inner cells, they are easier to get out. Then work your way out.
You could also use a dead (really dead!!!!!) cell. But then ud need to push on the negative part of cells in the pack as to not short out the positive and negative when maybe squishing through the wrapper.
Outside cells are a pain. Scratch off as much silicone from everywhere as you can!
Then repeat from above.
When you reach about 10 cells left in the outer ring you can start trying to pry the holders apart.

GOOD LUCK! (You will need it :D )

HI J-Man,
first of all, sorry for the cell issue... ill still come down on this later.
I have had seen on your report on the "Black Block" and i was afraid of having equally ones only seconds after i opened the casing.
Now i do even more understand what you wrote " I want to have that cells" :D .

Thanks for the description of your process, as far as i have seen now into my ones they would exactly to be processed that way.

Now, for the moment, i am checking them just as they are, in the block, why demount them if they are bad ? :D
For this, the B6AC i love so much are the perfect tool, i just connect half of the pack as 5s6p to the B6AC and can load/ balance it. During loading you can already see how the cess/Voltages behave.
Discharging i do support with my "current enhancer", pictures are already here on the board, just the circuit plan is missing until now. This can dissipate 50w, probably as well 100 Watt.
 
Things you just dont want to know:
2 Blocks, 120 cells, close to equal capacity at 3 Ah/cell. (Panasonic 3,2 Ah nom.)
1 Block. 60 cells, nearly equal capacity at 1,8 Ah/Cell. (Sony)

1 Block in test...

I will sprinkle more salt into your wounds as soon as i have all results... :D
 
Cherry67 said:
Things you just dont want to know:
2 Blocks, 120 cells, close to equal capacity at 3 Ah/cell. (Panasonic 3,2 Ah nom.)
1 Block. 60 cells, nearly equal capacity at 1,8 Ah/Cell. (Sony)

1 Block in test...

I will sprinkle more salt into your wounds as soon as i have all results... :D

Good stuff.
And then all of a sudden you go through all that effort to take those damn things apart...
 
The-J-Man said:
Cherry67 said:
Things you just dont want to know:
2 Blocks, 120 cells, close to equal capacity at 3 Ah/cell. (Panasonic 3,2 Ah nom.)
1 Block. 60 cells, nearly equal capacity at 1,8 Ah/Cell. (Sony)

1 Block in test...

I will sprinkle more salt into your wounds as soon as i have all results... :D

Good stuff.
And then all of a sudden you go through all that effort to take those damn things apart...
Oh no. I am quite sure i will not.
Never change a running team ! :D
 
Block 4 lower half (30 cells 5s6p) show a whopping 19 Ah.
Woa ! :D
 
Removed because wrong thread.
 
Back
Top