You are using an out of date browser. It may not display this or other websites correctly.
You should upgrade or use an alternative browser.
You should upgrade or use an alternative browser.
My Wall of Power
- Thread starter AZ_Tekkie
- Start date

AZ_Tekkie
Member
- Joined
- Oct 8, 2016
- Messages
- 168
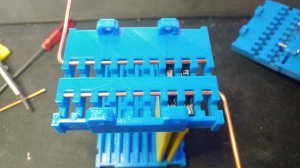
I've started prototyping some mounting brackets for my LG G5 batteries. Got my first box of 150 of the batteries. Planning a 81p7s pack. These batteries have a max voltage of 4.4 and a minimum voltage of 2.7. I'll be running them at the same voltages i run my 18650's at though. Should increase the lifespan significantly.


We lost power last night, was feeling pretty smug having the onlywifi network up in the neighborhood lol.
[img=100x150]http://i1.kym-cdn.com/photos/images/original/001/077/815/a7b.png[/img]


We lost power last night, was feeling pretty smug having the onlywifi network up in the neighborhood lol.
[img=100x150]http://i1.kym-cdn.com/photos/images/original/001/077/815/a7b.png[/img]
AZ_Tekkie
Member
- Joined
- Oct 8, 2016
- Messages
- 168
Scepterr said:Are you taking the PCB off the G5 batteries ?
yup, it's really easy, just cut a little of the wrapper back and the top pops off with some plastic clips. One unusual thing i found out, the casing is the positive and the center contact is the negative.
Scepterr
Member
- Joined
- Feb 19, 2017
- Messages
- 226
Have you examined the PCB for protection mechanisms? Might be worth keeping on
Would also be kinda awesome to make a PCB to connect all the data lines and have live data for every cell, I think they use i2c protocol
Pogopins in a breadboard would be pretty cheap
Would also be kinda awesome to make a PCB to connect all the data lines and have live data for every cell, I think they use i2c protocol
Pogopins in a breadboard would be pretty cheap
AZ_Tekkie
Member
- Joined
- Oct 8, 2016
- Messages
- 168
Scepterr said:Have you examined the PCB for protection mechanisms? Might be worth keeping on
Would also be kinda awesome to make a PCB to connect all the data lines and have live data for every cell, I think they use i2c protocol
Pogopins in a breadboard would be pretty cheap
that's a bit beyond me. There's some resistors and some IC chips about all i can tell. Too small to read anything on them. Easier to just remove them and use a BMS.
1958 greyhound
Member
- Joined
- May 13, 2017
- Messages
- 263
Very cool plastic.
Now I have questions.
I uploaded a plastic part to one of the online printing places and about craped when I saw the price, I could get 10 of them machined out of aluminum for the same price.
So to buy or build a 3d printer, what is the cost to run it?
And plastic cost?
Now I have questions.
I uploaded a plastic part to one of the online printing places and about craped when I saw the price, I could get 10 of them machined out of aluminum for the same price.
So to buy or build a 3d printer, what is the cost to run it?
And plastic cost?
AZ_Tekkie
Member
- Joined
- Oct 8, 2016
- Messages
- 168
1958greyhound said:Very cool plastic.
Now I have questions.
I uploaded a plastic part to one of the online printing places and about craped when I saw the price, I could get 10 of them machined out of aluminum for the same price.
So to buy or build a 3d printer, what is the cost to run it?
And plastic cost?
It's certainly not a cheap hobby. I've probably spent at least $1500 between my two printers and filament. Basic kits start at $200 on ebay, probably best to start there and get your feet wet, then you'll have more of an idea on what upgrades you can buy or what to look for if you want to fork over for a more expensive printer.
You're in arizona though so if you had some models you wanted to print i might be able to do them for material cost, i'm up in the phoenix area.
1958 greyhound
Member
- Joined
- May 13, 2017
- Messages
- 263
How much is material cost?
AZ_Tekkie
Member
- Joined
- Oct 8, 2016
- Messages
- 168
AZ_Tekkie
Member
- Joined
- Oct 8, 2016
- Messages
- 168
Alec_J said:Wow! That's awesome man! Great progress.
Where did you get those LG cells? They aren't cheap.
I got them for free from work. We're a pretty big LG phone reseller so it comes with some perks.
howiegrapek
Member
- Joined
- Sep 25, 2017
- Messages
- 52
AZ_Tekkie said:
These is a very nice setup.
I have a couple of questions:
I know your mounts are custom as described earlier, and you answered about the glass fuses...
a) the battery box you are using, can you provide dimensions to it and where you sourced it?
b) What fabrication did you do to it to get your mounts to work specifically?
c) Do you have a pack build video? I'm intrigued at the screws holding down the bus bars - how did you do that, and are you finding any issues?
Thanks a bunch.
AZ_Tekkie
Member
- Joined
- Oct 8, 2016
- Messages
- 168
howiegrapek said:AZ_Tekkie said:
These is a very nice setup.
I have a couple of questions:
I know your mounts are custom as described earlier, and you answered about the glass fuses...
a) the battery box you are using, can you provide dimensions to it and where you sourced it?
b) What fabrication did you do to it to get your mounts to work specifically?
c) Do you have a pack build video? I'm intrigued at the screws holding down the bus bars - how did you do that, and are you finding any issues?
Thanks a bunch.
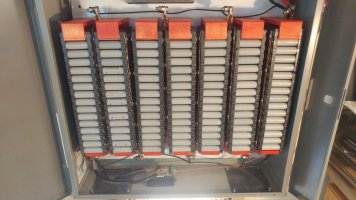
The box is about 24"x24" and about 6" deep. I got it from a local electrical surplus place. As far as the fabrication i just had to drill and install new latches because the built in lock stuck in about an inch and hit my last pack because the packs are so large that they stick out about to the door now.
No videos, i just used coarse thread screws with washers to screw right into the plastic cell holders. Seems to hold it well as long as i don't pull on them which will strip them out pretty easily with any force.
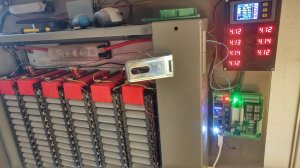
As another update, just got a batrium bms andit's up and running as of 10min ago.


Just need to get the shunt installed and figure out how i'm going to setup my remote trip breaker. I'm planning to pull everything off the wall and rearrange to be able to fit both of my battery packs.
davidpesce
New member
- Joined
- Sep 16, 2017
- Messages
- 14
AZ_Tekkie said:howiegrapek said:AZ_Tekkie said:
These is a very nice setup.
I have a couple of questions:
I know your mounts are custom as described earlier, and you answered about the glass fuses...
a) the battery box you are using, can you provide dimensions to it and where you sourced it?
b) What fabrication did you do to it to get your mounts to work specifically?
c) Do you have a pack build video? I'm intrigued at the screws holding down the bus bars - how did you do that, and are you finding any issues?
Thanks a bunch.
The box is about 24"x24" and about 6" deep. I got it from a local electrical surplus place. As far as the fabrication i just had to drill and install new latches because the built in lock stuck in about an inch and hit my last pack because the packs are so large that they stick out about to the door now.
No videos, i just used coarse thread screws with washers to screw right into the plastic cell holders. Seems to hold it well as long as i don't pull on them which will strip them out pretty easily with any force.
As another update, just got a batrium bms andit's up and running as of 10min ago.
Just need to get the shunt installed and figure out how i'm going to setup my remote trip breaker. I'm planning to pull everything off the wall and rearrange to be able to fit both of my battery packs.
Can you post the stl to the 18650 mounts you used?
AZ_Tekkie
Member
- Joined
- Oct 8, 2016
- Messages
- 168
davidpesce said:AZ_Tekkie said:howiegrapek said:AZ_Tekkie said:And we're live. Made one design flaw though, the batteries stick out further than i anticipated and interfer with the door on the cabinet closing and locking. I'll have to do some slight fabrication to the door to get it back in working order.
These is a very nice setup.
I have a couple of questions:
I know your mounts are custom as described earlier, and you answered about the glass fuses...
a) the battery box you are using, can you provide dimensions to it and where you sourced it?
b) What fabrication did you do to it to get your mounts to work specifically?
c) Do you have a pack build video? I'm intrigued at the screws holding down the bus bars - how did you do that, and are you finding any issues?
Thanks a bunch.
The box is about 24"x24" and about 6" deep. I got it from a local electrical surplus place. As far as the fabrication i just had to drill and install new latches because the built in lock stuck in about an inch and hit my last pack because the packs are so large that they stick out about to the door now.
No videos, i just used coarse thread screws with washers to screw right into the plastic cell holders. Seems to hold it well as long as i don't pull on them which will strip them out pretty easily with any force.
As another update, just got a batrium bms andit's up and running as of 10min ago.
Just need to get the shunt installed and figure out how i'm going to setup my remote trip breaker. I'm planning to pull everything off the wall and rearrange to be able to fit both of my battery packs.
Can you post the stl to the 18650 mounts you used?
Here's the Thingiverse link: https://www.thingiverse.com/thing:2572115
davidpesce
New member
- Joined
- Sep 16, 2017
- Messages
- 14
What type of infill did you do on the top part of the mount? Oh, and what type of material did you use PLA/ABS?
The top part makes me a bit nervous when holding the pack from falling.
The top part makes me a bit nervous when holding the pack from falling.


